
Are you considering installing epoxy floors with flakes in your home or commercial space? Epoxy floors are a popular choice due to their durability, easy maintenance, chemical resistance, and aesthetic appeal.
We will discuss the benefits of epoxy floors and guide you on how to prepare for installation, apply epoxy floors with flakes, and maintain them. Whether you are a DIY enthusiast or hiring a professional, this article will provide you with valuable insights for a successful epoxy floor project.
Contents
Epoxy floors, such as the Epoxy Flake Flooring System, are highly durable and versatile flooring solutions made by combining resin and hardeners to create a robust, seamless coating over concrete surfaces.
Epoxy floors have gained popularity due to their ability to withstand heavy foot traffic and resist stains, making them ideal for various applications in both residential and commercial settings. In homes, epoxy floors are commonly used in garages, basements, and kitchens for their durability and easy maintenance. In commercial spaces such as warehouses, hospitals, and industrial facilities, epoxy floors provide a hygienic, seamless surface that is easy to clean.
This system not only enhances the aesthetic appeal of the space but also provides additional slip resistance, making it a practical choice for areas that require both functionality and design.
Check out: Is Epoxy Flooring Good For Living Room
Epoxy floors, including Epoxy Flake Flooring, offer a wide range of benefits, making them an ideal coating solution for various environments, from residential garages to large industrial spaces.
One of the most significant benefits of using a Durable Flake system is its exceptional durability, particularly when applied to concrete floors.
In terms of durability, the secret lies in the unique composition of epoxy flooring. The powerful combination of resin and hardener creates a solid and resilient surface that can withstand not only heavy foot traffic but also the impact of heavy machinery and equipment.
These two components work together to form a chemical bond that penetrates deep into the concrete substrate, creating a tough and impermeable barrier. This makes epoxy floors highly resistant to scratches, stains, chemicals, and moisture, ensuring a long-lasting solution for industrial, commercial, and even residential settings.
Epoxy Flake Coating systems are renowned for their easy maintenance, as their non-porous surfaces make cleaning a simple task.
The benefit of epoxy floors extends beyond their durability and aesthetics. One of the standout advantages is the effortless cleaning process they offer. Due to their impermeable nature, dirt, dust, and spills stay on the surface, making it a breeze to wipe them away with a damp cloth or mop. The seamless finish of epoxy floors prevents the accumulation of grime and bacteria, promoting a hygienic environment with minimal effort required.
Epoxy floors, especially those using an Industrial Flake system, provide excellent chemical resistance, making them suitable for environments where chemical spills are a concern.
This exceptional chemical resistance of epoxy floors means they can withstand exposure to a wide range of substances, including acids, oils, greases, and solvents. In industrial and commercial settings where harsh chemicals are commonly used or stored, having epoxy floors can prevent damage and ensure a safer working environment.
For example, in manufacturing plants, laboratories, or warehouses, accidents involving chemical spills can happen, and having epoxy floors that can resist these substances is crucial to prevent costly damage and ensure workplace safety.
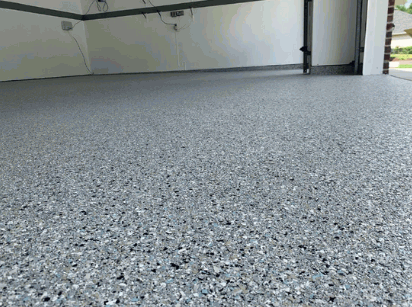
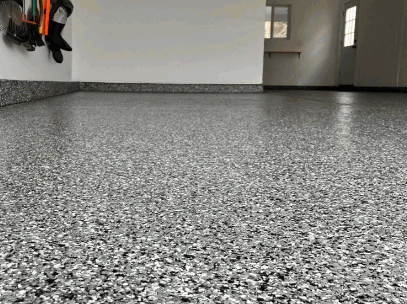
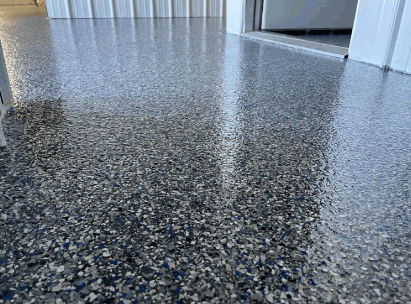
Aesthetically, epoxy floors offer numerous Colour Options and unique Flake Features that can be tailored to complement any decor or functional need.
Epoxy floors are renowned for their ability to transform a space with vibrant hues and customised patterns. The Colour Options range from earthy tones to bold, eye-catching shades, allowing for endless creativity in design. In terms of Flake Features, the small metallic or coloured chips are not only visually appealing but also add texture and depth to the floor surface, creating a sophisticated and dynamic look.
By experimenting with different flake styles and colour combinations, one can achieve a personalised aesthetic that suits both residential and commercial settings. Whether aiming for a modern, sleek appearance or a more rustic charm, epoxy floors provide versatility and durability while enhancing the overall visual appeal of the space.
Proper preparation is crucial for a successful Epoxy Floor installation, and it involves thorough Space Preparation and meticulous assessment of the Concrete Surface to ensure optimal adhesion and finish.
The first step in preparing your concrete floors for an epoxy coating is to clean and dry the surface thoroughly, ensuring there are no contaminants that could affect adhesion.
It is crucial to wait until the concrete is completely dry before proceeding with the epoxy application. Any residual moisture can interfere with the bonding process, leading to a compromised finish. Utilise fans, or dehumidifiers, or wait a sufficient amount of time for the concrete to dry naturally.
By following these steps and ensuring a pristine, clean surface, you set the foundation for a successful and durable epoxy flooring that will stand the test of time.
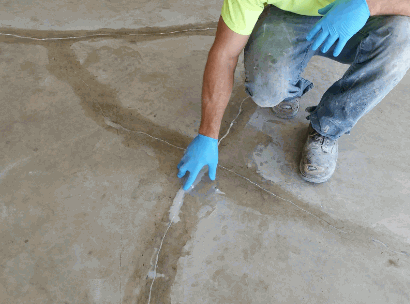
Before applying the epoxy resin system, it is essential to repair any cracks or damages in the concrete floors to ensure a smooth and even finish.
Repairing cracks and damages in concrete floors requires attention to detail and the right materials. First, assess the extent of the damage to determine the appropriate repair method. For small cracks, a quick-fix epoxy filler can be used, while larger damages may require more extensive repair work.
Once the damaged areas are identified, clean them thoroughly to remove any debris or loose particles. Use a wire brush or vacuum to ensure a clean surface for optimal adhesion of the repair materials. Depending on the type of damage, different repair materials such as concrete patching compound or mortar may be needed.
Selecting the right epoxy and quality flakes is crucial for achieving the desired finish and performance, and each product description should be carefully reviewed to match the specific needs of your project.
When choosing an epoxy, consider the type of surface you are working with - whether it's concrete, wood, metal, or another material. Different epoxies may be formulated for optimal adhesion and durability on specific surfaces.
Think about the environment where the epoxy will be applied. For areas exposed to high temperatures or UV radiation, UV-resistant or heat-resistant epoxies may be required for long-lasting results.
As for flakes, quality and size matter. Opt for high-quality flakes that are UV-stable and colourfast to maintain their appearance over time.
Applying epoxy floors with flakes involves a meticulous step-by-step guide to ensure a flawless finish, starting with:
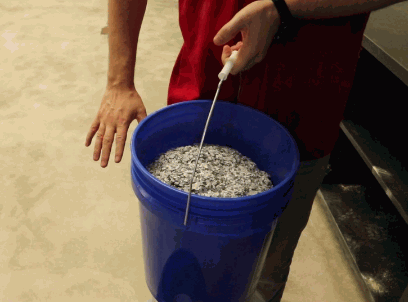
When mixing epoxy resin with flakes, it is crucial to maintain the right ratios to achieve optimal results. Typically, a common ratio is one part resin to one part flakes, but this may vary based on the specific product being used.
To ensure a consistent blend, you will need tools such as measuring cups, mixing sticks, and a clean mixing container. Begin by measuring out the resin and flakes according to the recommended ratio and carefully combine them using a gentle stirring motion.
Strive for a thorough mix, scraping the sides and bottom of the container to incorporate all components uniformly. This meticulous process guarantees a homogeneous mixture that will result in a flawless finish for your project.
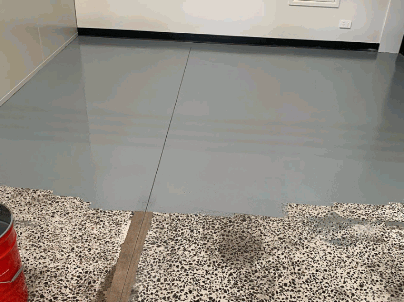
Once the epoxy and flakes are mixed, the next step is to apply the base coat, which acts as a primer to create a strong bond with the concrete surface.
Before starting the application of the base coat, it is crucial to properly prepare the concrete surface. Clean the area thoroughly to remove any dust, dirt, or debris that may hinder adhesion.
When everything is clean, ensure the surface is completely dry before proceeding. This will help the base coat adhere better and provide a more uniform finish.
Using a paint roller or brush, apply the base coat evenly in smooth, overlapping strokes to achieve an even coverage. Take your time to ensure no spots are missed for a professional-looking result.
Allow the base coat to dry according to the manufacturer's instructions before moving on to the next steps in the epoxy flooring application process.
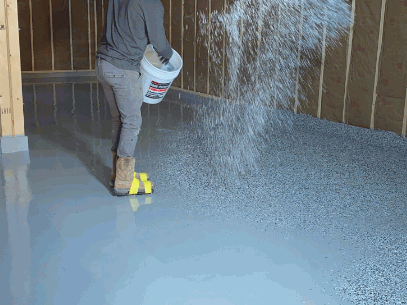
After applying the base coat, the flakes need to be scattered across the surface, either in a full-blind method or to the desired coverage density, often using spike shoes to walk on the wet epoxy.
One common method for scattering flakes evenly is to use a handheld broadcast spreader, which allows for uniform distribution. Alternatively, some professionals prefer the 'chop brush' technique, where they throw the flakes by hand from a distance to achieve a random pattern.
To control coverage, painters may adjust the application rate of the flakes or use masking tape to create borders for specific design effects. Consistency in scattering is key to achieving a professional finish, whether aiming for a light dusting or a dense coverage.
The final step is to apply the top coat, which acts as a sealer to protect the flakes and provide a durable, non-slip surface, often enhanced with a non-slip additive.
Before applying the top coat, it's crucial to thoroughly mix the product to ensure even dispersion of the protective elements. Follow the manufacturer's guidelines for the correct ratio of the top coat to any additional additives, if needed.
In terms of the application process, start by using a high-quality roller or brush to evenly distribute the top coat over the prepared surface. Work in small sections to ensure uniform coverage and avoid pooling or streaking.
Once the top coat is applied, allow it to cure for the recommended time before subjecting it to any foot traffic or heavy use. This curing period is essential to allow the sealant to bond properly and achieve its full protective capabilities.

Maintaining epoxy floors with chips involves:
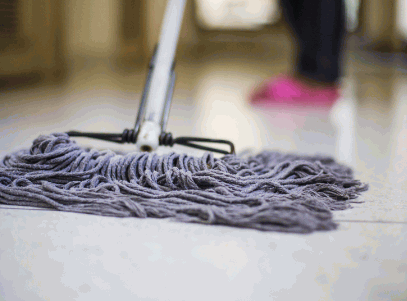
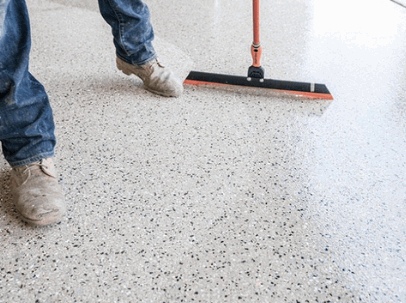
Regular cleaning of epoxy floors is essential to prevent the buildup of dirt and grime, and it can be easily done using a paint stick or mop to maintain a pristine surface.
For routine maintenance, it's recommended to sweep or vacuum the floor regularly to remove loose dirt and debris. Using a soft-bristle broom or a vacuum with a brush attachment can effectively clean the surface without causing any damage.
For deeper cleaning, a mixture of warm water and a gentle floor cleaner can be used. Avoid harsh chemicals that can degrade the epoxy coating. Use a mop dampened with this solution to thoroughly cleanse the floor, ensuring all areas are covered.
Additionally, avoid using abrasive tools or scrub brushes that may scratch the surface, compromising its durability.
To maintain the quality of the epoxy floor, it is important to avoid using harsh chemicals that can damage the sealer and concrete surface.
Examples of chemicals to avoid include strong acids like hydrochloric acid, alkalis like ammonia, and abrasive cleaners that can scratch the surface.
Therefore, opt for gentle cleaners like mild soap, vinegar, or specialised pH-neutral cleaners designed for epoxy floors.
Using a soft mop and warm water can also effectively clean the surface without causing any harm.
Promptly repairing any damages to the epoxy flake coating, such as chips or cracks, is crucial to prevent moisture from curing under the surface and causing further deterioration.